Faith, Family, Friends, Fellowship, Food, and Fun


Friday, June 22, 2012

Life's Ups and Downs

One of my favorite bloggers says she will never post about anything bad that happens in her home. Well, I'm not that way. I know we shouldn't dwell on the bad things in our lives, but we shouldn't portray our lives as perfect, June Cleaver, types of homes. I find my greatest conversations with friends are about the struggles in our lives and how we can not only share our personal experiences, but also lift each other up.

With all that off my chest I have to announce that I lost the baby I announced I was pregnant with just a few weeks ago. I went in for my BIG sonogram only to see for myself that there was no heartbeat and the baby was not moving. I was strong for my husband and kids. This wasn't the first miscarriage, I just thought we had passed the latest point that I had miscarried before and I have really taken better care of myself this time. I am not working so I rested as much as possible. I had just announced the good news to my closest friends 8 days before and it was a bit exciting to tell everyone I was 19 weeks!

The hardest part of it all was finding out that I was so far along, I'd have to be induced and deliver the baby. So, on May 23, Lindsey Michelle was delivered at a mere 3 oz. It was an experience I tried to prepare for by talking to others who told me they had been through it themselves. I knew exactly what to expect....except that it would be the longest labor of all my deliveries.

Here we are 4 weeks later and I have to say I am healing. It was with the help of my dear friends who didn't know what to do except cook. And I must say my friends know how to cook! It wasn't the food that helped with the healing, although it was nice not having to worry about meal planning, grocery shopping, cooking, and cleaning up), what I will always remember most is the hugs, prayers, phone calls, and well wishes of people I never even knew cared.

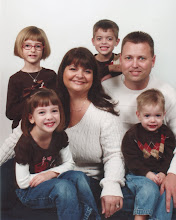
So if you know of someone going through a loss, what they probably need most is a hug and a listening ear. And for now, I am putting the 'downs' behind me and focusing on the 'ups' that I have been blessed with, especially my beautiful family and my loving friends.

Tuesday, June 19, 2012

#138 Little Chef's School- Summer Bucket List

Down where we live we have a grocery store called H-E-B and they have a free cooking class for kids every Tuesday in the summer. This is the 2nd one we attended and the kids made mini pizzas. Today they made some yummy hummus wraps and chocolate chip dip for apples. The kids look forward to going each week.


The kids have also made their own corn dogs (hot dog baked in muffin mix), worms in dirt, and candy bars (melted chocolate with mix-ins the kids pick) then cooled into solid form.

#187 Summer Bucket List MYO Wallpaper


It took me several days to make this, but it was well worth it.

#184 Summer Bucket List Tape Painting

Supplies: canvas, good masking tape, paint, paintbrushes, cups for paint

First tape the canvas, making sure to smooth out bubbles.

Next, pick your colors.

 Third, paint each section.

Last, peel the tape off.


My kids really enjoyed this project today, especially since the rain interrupted their swimming.
We bought the canvas 50% off at Hobby Lobby. Do not buy cheap tape, we bought ours at Dollar Tree and it didn't stick well at all.


Thursday, May 10, 2012

Happy Birthday, Spencer

 2 Years Old

 1st Birthday
      2 weeks old with my favorite doctor
A few minutes old

I really think Spencer has changed more than Lauren, Caleb, or Abby. His hair was so dark and now he is practically blonde. This sweet boy has brought so much joy into our lives. He loves to call Lauren, "Sissy" and if she doesn't answer, he just says it louder and louder. The same if you don't respond when he says ank you. I love to hear him say, 'ere it is!" When he is looking for something because he says it with such emphasis. He loves to see the school buses that stop across the street as well as planes and trains, he always waves and tells them bye-bye. Other words he says include: ball, swing, eye, ose, outh, head, ears, oon (spoon), ot (snot), ean up (clean up), irdie, ish (finished), up, ate (gate), ooey ooey (Umi Zumi), ucky hands, ead (read), drink, milk (sounds like oke), juice, ipper (Chipper), Daddy, Da-Da (me), Ickey Ouse, Oodles (Toodles), ight (light), side (outside), oli oli (ravioli), ash (trash), Aggie (whenever he sees the ATM), uzzle, shoe shoe, cheese, Abby, Ub (Caleb), uck (Stuck), ain (train and plane), tee-tee, cookies, uit bites, this, that, hello, elp (help), oos oos (Blue's Clues), baby, ocean (lotion), uh-huh, ubbles, eat, the end, Percy, ack (track), cake, E I (butterfly), shoo fly, see, bath, izza, oothush (toothbrush), aste (toothpaste), and more. When we are in the van and have to stop, he orders us to, "Go! Go!" I think his favorite thing to say is, "Daddy home!!"

At prayertime, he knows exactly when to get the prayer cube or prayer cards. If he gets a prayer card, he points to the card and mummbles as if he is reading. Then he puts it right back. After kisses, he runs into the girls' room and snuggles up in Abby's bed. He stays in there with Lauren until we insist that he come out and let her sleep.

He loves to play outside with his brother and sisters, and he loves to jump on the trampoline. He has just learned how to snap the Thomas train tracks together by himself. He likes to play dolls with Abby so I use it as an opportunity to prepare him for his baby brother or sister. He sings along with songs such as the ABCs, Barney, songs his Mickey doll sings, the intro to Mickey Mouse Clubhouse, Calliou, and the Pandamania CD in the van.

This sweet boy brings so much joy to my days. I am so blessed to be the mother of 4 precious children and can't wait to make it 5.

Tuesday, May 8, 2012

Here We Grow Again


That's right, I'm expecting. My due date is October 5, but we all know I haven't even made it to 37 weeks so September 18 is more realistic for me. It has been the roughest pregnancy by far (including the 3 miscarriages). I was a mess for almost 3 months experiencing much more than just morning sickness. I mean, I did have some pretty scary vomitting spells, sometimes throwing up 9 times in one session. I also had nausea and aversion to food in general, which was a vicious cycle. I had the most painful bloating at the beginning of the pregnancy. Twice I told Stephen to get the keys to take me to the ER because I had NEVER been in so much pain.

Once that problem was solved, I battled a little depression and a little anxiety. You don't know how debilitating this is unless you have experienced it yourself. Add in a lack of a good night's sleep, and you might as well go to a mental hospital. I was waking up every single hour to use the bathroom and then around 4:20 I couldn't go back to sleep until just before the alarm. I can't tell you how many hours I spent praying and singing church songs to help me pass the time. I don't believe in getting up because I have faith that I'll eventually go back to sleep. I am forever grateful to a friend who suggested I try Tylenol PM. I slept 5 hours straight that first night and woke up with no more anxiety or depression. Thank God for friends! And thank God my my amazing husband who had to prepare dinner for over 2 months. Seriously!

Thankfully that has all passed and I am back to myself. I am still exhausted, but who isn't? I am finally at a point where I am waiting in joyful anticipation of the precious life God has blessed us with. I always wanted a large family, I just never thought I'd be having it so late in life.

Monday, May 7, 2012

Lauren's 1st Communion

 Lauren and her banner.

 Lauren and her sweet friend, Emmeline

 1st Communion Cake

 Our growing family

Our family picture would not be complete without Aunt Joanie, Uncle Paul, and Ryan. We are so blessed to have them in our lives.

The special day finally came. After a whole year of preparing, including me attending 10 RE classes, 2 meetings, and a retreat, Lauren made her 1st Communion. It was a beautiful day and a bit emotional as I remembered that my mom was there in spirit. She would have been so very proud of Lauren. My aunt and I held back tears as she mentioned that to me the night before.

I just don't know what I would do without Aunt Joanie and Uncle Paul. I grew up with BIG family celebrations for all holidays and every one of my cousin's births, baptisms, 1st Communions, confirmations, and graduations. Those are truly the best memories of my childhood. I had always dreamed of having a big family and sharing all of life's accomplishments with lots of aunts, uncles, cousins, grandparents, etc.... but that wasn't God's plan for my family. Somehow, my aunt, uncle, and cousins fill in the gaps. They come 4 hours to share their faith and love with my kids. They play anything the kids want to play and give them their undivided attention for hours and hours. Each and every one of my children feel so special when they are around and as you can imagine, Stephen and I can let our guard down and relax a little. We enjoy celebrating mass with them and I love how my children behave and participate in mass when they are with us. Every time they leave, Stephen and I wish we lived closer. I try to plan in my head some way we can close the gap between College Station and Gladewater. For now, we will have to wait until the 4th of July to see them again and make new memories. 

1st Communion Banner

You will need:
scissors
swivel head precision blade (scrapbooking)
felt rectangle
wooden dowel
gold rick rack
gold glitter felt "paper" found in felt section at Hobby Lobby
white glitter felt "paper"
gold "rope" ribbon
felt glue
hot glue gun
patterns for the chalice and host (search on internet)
last name printed on computer using Microsoft word
marker for tracing

1) Cut out patterns of chalice, host, and letters
2) Trace on the back of the paper. Place letters upside down on the back of the glitter paper so that when you cut it out, the marker will be on the bottom.
3) Measure rick rack across the felt, leaving a little extra on each end.
4) Cut 3 2" strands of rick rack for the loops
5) Position all pieces on the felt as you wish to glue them.
6) Glue rick rack onto felt with felt glue. Apply pressure or set heavy books on the rick rack to dry (a few minutes).
7) Repeat for chalice, host, and letters.
8) Fold rick rack loops over and glue ends together with hot glue gun (felt glue did not work).
9) Place loops on dowel and space apart.
10) Hot glue the left and right ends first, making sure the dowel will be level. Then hot glue the middle loop.
11) Measure, cut, and tie the gold rope on each end of the dowel to hang the banner.


 I saw some other beautiful banners at our mass. Some families used religious scrapbook kits found in the scrapbook section of any craft store. Others used sequins. Some families fastened family pictures to their banners. Each one was so unique, just as our kids are.

Wednesday, April 25, 2012

Back to blogging!

It seems like I dropped off the face of the earth, but I've just been preoccupied with Facebook, Pinterest, and just being a stay at home mom. I am amazed that this school year is in the final 5 weeks. I think it has gone faster being a SAHM than as a teacher. I have learned so much about myself and my HIGH and unrealistic expectations for taking care of my home. I hope to use my blog to share my experiences because what I have found is that most of my friends have felt the same way, we just haven't had the opportunity to share our thoughts and feelings as we should.

It has definitely been a year of ups and downs and lots of life's surprises, but I am so excited about all that the future holds for us. 

Tuesday, November 22, 2011

Texas Aggie Cookies


I finally got to make some Aggie cookies for a customer. I see a few things I will do better next time, but these are not bad for the first batch.


For more cookie pictures, or for ordering information, check out Sweet Station on Facebook.

Tuesday, November 1, 2011

All Saints' Day

I did it! I made some simple saint costumes using pillowcases thanks to Catholic Icing and Shower of Roses. Another suggestion from Lacy at CI was to use a t-shirt that is turned inside out. If you cut out the neckhole just right, you get a little St. Francis cap, too.

Here they are: Blessed Kateri, my little angel, and St. Dominic.

I'm already planning for next year.

Monday, October 31, 2011

Costumes for All Saints' Day

I am a procrastinator this year....no, I just didn't have time to even try to put together costumes for my kids. I just started my candy/cookie business on October 1, and it's off to a good start so I've dedicated a lot of time to that.

I must admit my knowledge of saints is still in the beginning stage and since this will be the first year we can attend the celebration, I am frantically trying to put something together. I quickly turned to Catholic Icing for ideas. There are so many wonderful ideas that I became overwhelmed and started putting them altogether in a spreadsheet. That's my OCD kicking in and it's okay if you laugh at me. Anyway, I found that all you really need is a good robe (pillowcase with holes cut or an adult t-shirt turned inside out if you're really in a hurry) in brown, white, black, maybe red or green. For a veil, you could use a skirt. Some costumes require rope around the waist. Then you add some accessories. It seems so much simpler when written this way, but looking at all the fabulous ideas on the blog was overwhelming.

So I stayed up a litle late last night making a spreadsheet. I am grouping all girls' costumes and then all boys'. Then I am grouping them by color of robe. Last is a column listing what accessories are needed. It makes it seem so much simpler (in my head at least).

If anyone can tell me how to attach a spreadsheet or put it on a website you can link to, let me know so I can share. Until then, if you leave your email address, I'll be happy to email a copy of the unfinished spreadsheet to you.

Tuesday, October 11, 2011

Snack Time- Time Saver


For the first week of school, I found myself arguing with the kids about which snacks they could have. I wasted so much time trying to explain what was healthy and what was not, so I made a list of acceptable snacks. Then I made this picture "menu" so the kids could choose for themselves. The first few days we used it, they tried to ask me if they could have Oreos or candy. I just pointed them over to the pictures and told them if it isn't there, they can't have it. Now they take care of their own snacks and I have more time to get the smaller kids theirs.


This list comes in handy when I am making my grocery list as well.

Friday, October 7, 2011

#160 Make Your Own Puzzles


I was cutting boxes to make slotted disks when Lauren took the pieces and started putting them back together. It hit me that I could make my own puzzles using empty food boxes. You can make simple puzzles for 2-3 years olds by cutting 4-6 squares out of a picture with few details (Cap'n Crunch Cereal), or you can make them harder by cutting more squares, and by using scissors with different patterns.
For over 150 more fun and inexpensive things to do with kids, check out my Summer Bucket List.
You will need:
empty boxes, scissors, a paper cutter, baggies, pencil, ruler


1) Cut the face of the box away from the rest of the box.


2) Using a ruler, draw your puzzle design on the back. The more puzzles I made, the more designs I created.


3) Using scissors or a paper cutter, cut the pieces out.


4) Store in a baggie.

Saturday, September 10, 2011

#103 Marble Painting

You will need:
masking tape
cardstock
tempera paint
scissors
small containers for paint
lots of marbles
paper towels
another adult to help you if you have more than one child
a container to roll the marbles in such as a cut cereal box. Make sure it is 1" wider than the paper on all sides. Flats from soda cases are the best. 1. Fill containers with enough paint to cover the marbles.

2. Tape the paper inside the box.

3. Drop 2-3 marbles in the paint and swirl the container, making sure you cover the marbles.

4. Take the marbles out and place them on the paper.

5. Tilt the box back and forth to create different patterns.
6. Repeat with different colors.


7. Let dry and carefully remove from the cardboard.


Each masterpeice is unique, just like my kids.

For over 200 more ideas of Summer Fun, click here.